Thursday, May 18, 2017

"Painting" with embossing powders

The other day I shared a tag I made on facebook, and numerous people asked how I did it and wanted a tutorial. So I am going to show you how I did it.

This is the tag I first did with this technique. The swallow and flowers are different colours of embossing powder.


All you need is some card stock that is not too absorbant. You want your embossing ink to stay wet for as long as possible. I use a very smooth cars stock. And you need some colours of embossing powder and a craft stick or teeny tiny spoon. After the first try with my craft sticks, I looked online to see if I could find some laboratory scoops, so I can work even more precise. I am happy to say I found some on eBay and am waiting for those.

I selected a few of my glorious Emerald Creek embossing powders. They are so rich and some are so glittery. I used a stamp that would show off this technique well. 


Here you see the image stamped with embossing ink. I tried various types of paper to do this, a semi glossy or very smooth surface works best. 

With my craft srick I scooped up a small amount of embossing powder and sprinkled it over the areas that I want to be that colour. 
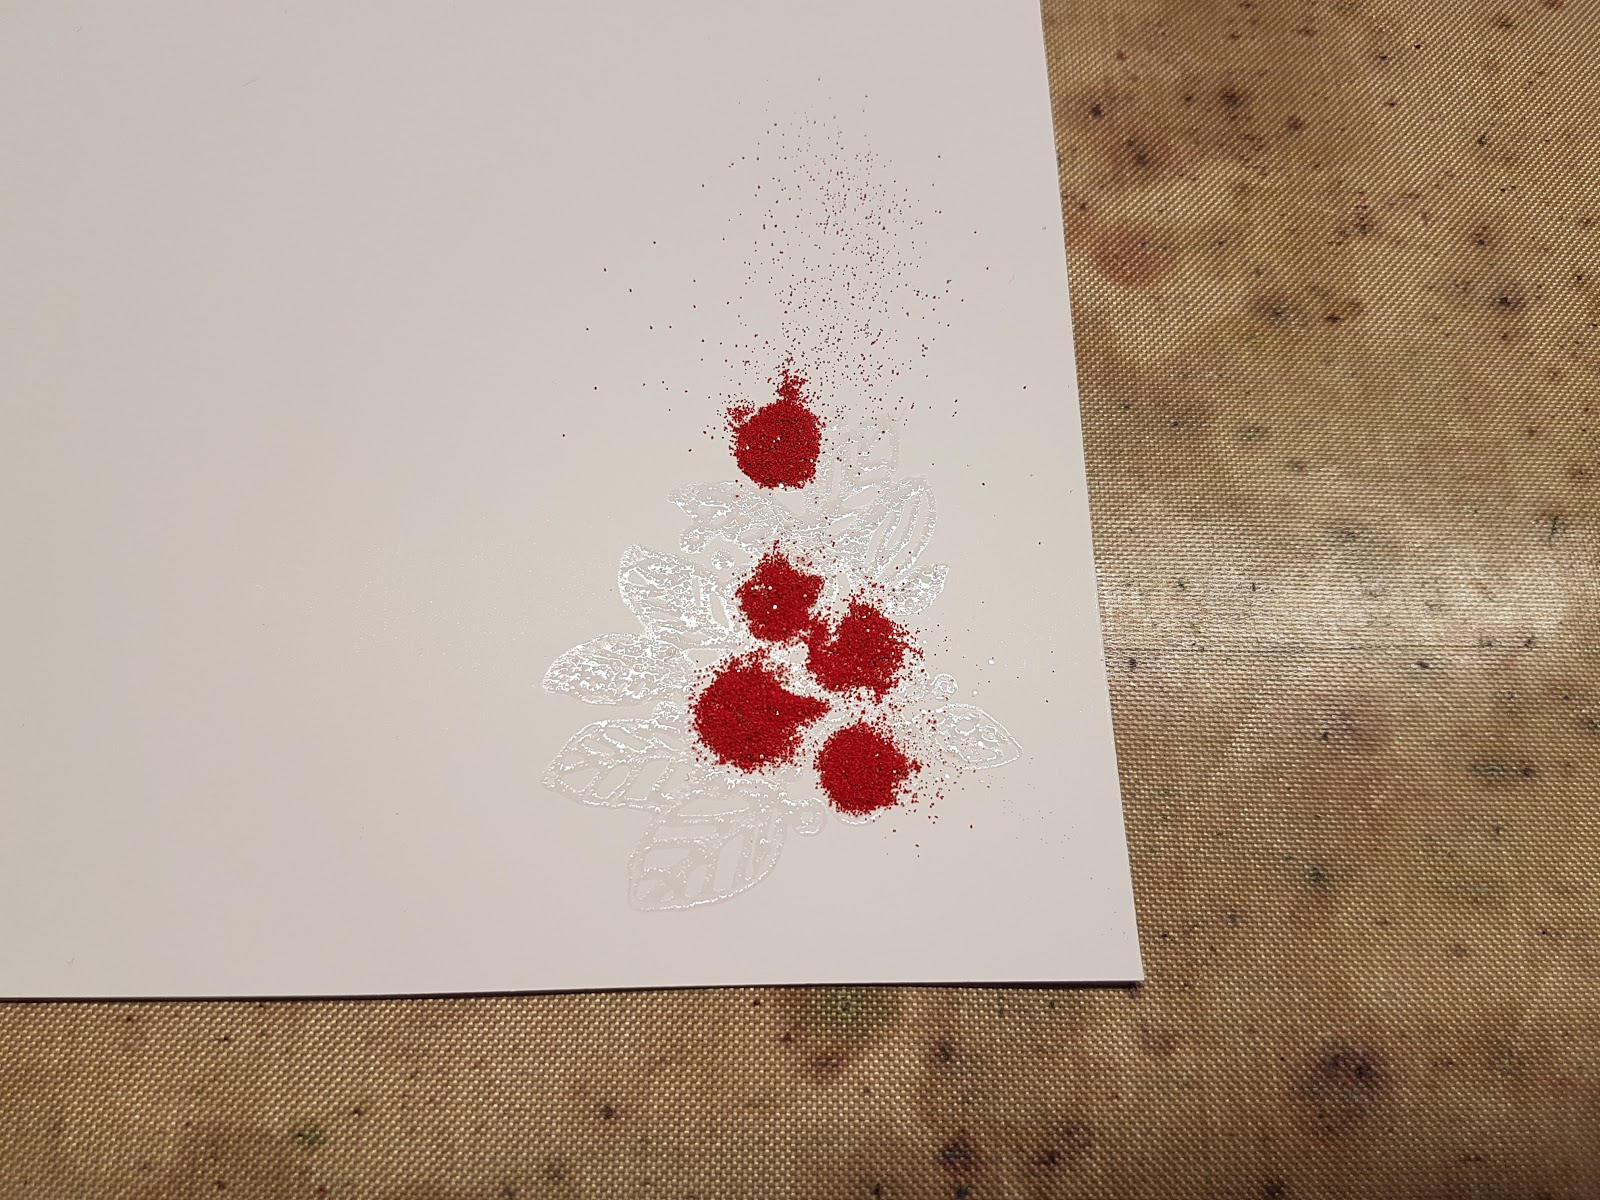
In this case I sprinkled Chinese red over the roses.

After I finished covering the red areas, I covered it with St. Paddy's green to colour the rest. In this case I only used two colours. On the finished tag you see that I did another image with more colours. You can sprinkle as many colours on an image as you like, just remember not to remove the excess powder before you are completely done. If you do the powder will stick to areas you don't want. So in the end, when you do tap off the excess embossing powder, you have a mix of various colours. I used some of it to heat emboss the sentiment. The rest I put in what I call the party jar. It is a jar with mixed embossingpowders. I use it sometimes for heat emboss embellishments or sentiments. It looks like miniature confetti.

Here I used Sweet Valentine and Sparkly Green powders also from Emerald Creek Craft Supplies.

On this stamped image I used the sparkly green, Easter Parade and Chinese red embossing powders. The more I played, the better I could control my powders. 
This was my favourite result yet....

I can't wait to get my mini scoops so I can play even more....

After staining a manila tag with tumbled glass distress stain, I stamped the sentiment with embossing ink and embossed it with the mixed powders leftover from my "painting". I die cut the florals and glued them on my tag. I stained a piece of crinkle ribbon with squeezed lemonade distress stain and made my fluffy bow. 

I will do another fluffy bow tutorial very soon. The other one I did was a long time ago, so a new one is required ;-) as people keep asking me how I make my bows.

I hope you enjoyed my experiment. I can't wait to see if more people are willing to try this.

Have a wonderful day, thank you for stepping by.

Take care and keep your craft on!
Freddie
xxx


Tuesday, May 2, 2017

Rosegarden lantern

It is no secret that I love the illuminary die from Tim Holtz, to create little lanterns. This time I made one decorated with red felt roses and aventurine and golden tigereye quarry stones from Emerald Creek Craft Supplies. As well as forrest foliage embossing powder, also from ECCS. I loooove their products!

I cut the illuminary from gold mirror card and very lightly sanded it with very coarse sand paper. I cut some vellum to size and as my husband was peeping into my room, to see what I was up to, said it would be cool to have a cracked window on one side, so I stamped a crack on one of the pieces of vellum. It was a cracker idea!!!


I cut some roses from red felt with the tattered pinecone die from Tim Holtz. It makes beautiful roses!! In the heart of the roses I glued some golden tigereye quarry stones to finish them off. I cut some leaves with a punch and heat embossed them with the vintage ivy embossing powder.

 Around the roses I glued some aventurine quarry stones to add some interest and texture. I think from all the quarry stones, the aventurine are my favourite.


And here the finished lantern :-)

Thank you so much for taking the time to have a look. I hope to see you here again.

Have a great day, take care and keep your craft on!

Freddie
xxx

Friday, April 21, 2017

Mixed Media Mojo April challenge

As I was picked as the winner of the March Mixed Media Mojo winner, I was asked to post on their blog as a guest Design Team member. Needless to say is that I am extremely honored and flattered to no end!

My tutorial is for a mixed media tag for their April challenge "April showers with an umbrella as a twist". So this screamed for the Umbrella Man by Tim Holtz!!

I started off by cutting the umbrella man from a mixed media tag by Ranger. 

As April showers are the main theme, I am overloading this tag with every rain drop I can think of. The drop stamps are from Designsbyryn, the white raindrop stencil is by Emerald Creek Crafts and the other one is from Crafter's Companion. And I am going to slap on the layers.

I scribble some distress stains on my craft mat to create the background on my tag. Tumbled glass and stormy sky are just perfect.

The "wrinkle free distress" or "smooshing" technique is my favourite one ever. It creates a unique background every single time. And you can layer as much as you want, until the desired effect.

With a darker blue, chipped sapphire distress ink, I added the next layer on the tag. Small raindrops through the stencil. 

The next layer will be stamped raindrops with distress oxide. As the oxides are semi opaque, this lighter color will lay on top of the darker background. 

To create dimension, I decided to stamp larger drops in another lighter oxide. 

To make the drops more dimensional and realistic, I always add some highlights on them with a white gelli roll pen.

Here you see the difference between the smaller drops that have been highlighted, and the big ones, that haven't been done yet.

Still layering it up! I used Dreamweaver translucent embossing paste to create more raindrops with the second stencil. 

The paste is whitish to begin with, but it dries completely clear and shiny.

As the background dries, it is time for the umbrella man to get some life inked onto him. So I smooshed down some oxides onto my craft mat and sprayed it with water. Let the birth of Umbrella man begin!

I just loooooove how the oxides layer on top of eachother and how they react with water. He is ready for his next layer...

This crazing collage medium is a must have if you like a vintage look on things. It is AWESOME.....

Once the crazing is all dry, it is time to make sure they pop on the umbella man. So time for the crayons to make an appearance. I scribble some dark ground espresso distress crayon on my craft mat and spritz a little water on it and rub it all over my man. The crayon will go into the crazes and will make them more visible and give it a vintage look.

See what I mean? I am crazy about the crazing hahaha. 

I am going to add this word band to the tag. I highlighted the letters by rubbing white distress crayon over it and working it really well into the crevices.

To finish off the word band, I used two plain brads that I customised using one of my specialty embossing powders by Emerald Creek Craft, called Northern Lights. It is the most gorgeous mix of blue. 

As many of my crafty friends know, I always put fluffy bows on top of my tags. I am addicted to crinkle ribbon and stain it to match my projects. It takes distress inks and stains like nothing else. 

When it rains, your umbrella gets wet..... so I added a few droplets of Glossy Accents to emulate rain drops.


And voilà, the tag is all done. I inked the edges with walnut stain distress ink as it was a tad too blue and cold. This warmed it up a bit.  Thank you so much for taking the time to step by. 

Take care and keep your craft on!

Freddie
xxx


Friday, April 14, 2017

Gilding flake tree

When I received my tree stamp from Emerald Creek Craft Supplies, this card popped in my head. I haven't played with my gilding flakes for a while, and this tree just screamed for them.

I stamped the tree on black card with embossing ink and heat embossed it with sticky embossing powder. I dunked the image in my tub of gilding flakes and let it all cool off. After I plucked off the big flakes I "polished" the print with a scrubby.
 Emerald Creek Craft Supplies also has a new range of embellishments called Quarry stones. I decided to glue some of the purple ones on my tree. They also have metal word band that I used.


Here a close up of the quarry stones. I will be posting another project with them, another colour though, soon.

Thank you for stepping by and I hope to see you again soon.

Take care and keep your craft on :-)

Freddie xxx


Easter on my mind.

Due to various circumstances, I hardly crafted the last 7 weeks. I managed to dabble a bit half an hour here or there, but I made myself finish this one Easter lantern just in time.

I used the Tim Holtz Illuminary Bigz XL die by Sizzix to cut the lantern, and stained it with crushed olive distress stain. Then glued Easter Parade embossing powder from Emerald Creek Craft Supplies on it with collage matte medium. As I used acetate for the windows, I didn't want to heat emboss the powder.


I stamped the bunny, a stamp from Tim Holtz, with antique linen distress ink, on water color card stock and coloured it with various colours of distress markers and a water brush. After it dried I covered it with distress collage crazing medium to get the crazing effect. After that dried, I covered it with walnut stain distress crayon and a little water. That accentuates the crazing more.
I found these miniature plastic eggs at a specialist shop for bird breeding. They were white, so I stained them with alcohol inks in zip lock baggies. 


The little chicks I found at our local supermarket lol. They were meant as table decoration, but they are perfect for my lantern.

The nest I stamped is also a Tim Holtz stamp, not a surprise as 90% of my stamp collection is his! I stamped it twice and cut the whole nest out and the other cut out is just the front, so I could give it a 3D look with mounting foam.

I stamped the nest on watercolour card stock with brown stazon ink and scribbled over it with every brown distress marker in the collection lol.

And here the complete lantern. And I would like to take this opportunity to wish you all Happy Easter!

Take care and keep your craft on!

Freddie
xxx


Thursday, April 6, 2017

Embossing paste tutorial part 2

As promised another embossing paste tutorial, this time with white embosing paste.
 I spread the white embossing paste over parts of the stencil that was on top of my tag. The only downside of playing with embossing paste, is that you have to wait for it to dry. You can use a heat tool, but it will make the embossing paste go all puffy. 

After the paste is dry I ink over it with  distress ink and an ink blending tool. 

I always ink the edges of my tags with walnut stain distress ink. It adds interest and draws the eye to the middle of the tag.

 As soon as I saw the colour of the tag develop, I knew I would turn it into a beach themed tag. I stamped the shell, that is an Emerald Creek Craft Supply stamp, with Perfect Medium on black card stock. Then coloured it with various colours of Perfect Pearls, and cut it out. I mounted it and added the stamped sentiment. The brads are also from Emerald Creek as well as
 the "pebbles" on the bottom. They are from the Quarry Range. 

Here is a closer look of the Perfect Pearl  shell and the Quarry stones. 

Thank you for stepping by and I hope you visit again :-)

Take care and keep your craft on!
Freddie
xxx