Monday, May 22, 2017

Fluffy bow tutorial revisited...

Two years ago I did a tutorial on how I make my fluffy bows on tags. Today I show how I put them on cards. I use crinkle ribbon or seam binding to make my bows. I stain them either with distress stains, oxides, inks or markers. Depends on the look I am going for. This tutorial focusses on how I put them on my cards though.

I wrap ribbon around my hand, like in the pic, 6 times and cut that off. That way I have enough to make a lush fluffy bow on my card.

I stained the cut off piece of ribbon with worn lipstick distress stain. I dry it with my heat tool as it crinkles the ribbon a bit. It makes for a fluffier bow.

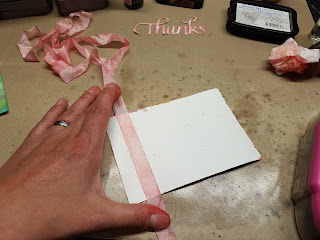
I measure out how much I need for the first part of the bow. I make sure I have enough to make a simple bow. I put the ribbon behind the piece of card I want to put the bow on, and make sure I have two pieces on each side to tie my bow. And cut the rest off. The cut off part will turn into the fluffy part of the bow.

I put a strip of double sided tape on the back of the card, where I want my bow to go. I used my ATG in this case, but if you don't have one, you can use any double sided tape. 
I put the piece of ribbon on the tape so it won't move anymore. 

I do the same on the front of the card. I put a strip of double sided tape down where I want my bow. This way it won't sag once you tied your bow. 

I tie the ribbon at the front and look where I want the bow. On this card I want it in the middle. Once I am satisfied where it is, I press the ribbon onto the sticky tape.

Here you see how the ribbon is neatly stuck to the card. So no matter how heavy and fluffy you make your bow, it will stay put!

I wrap the remainder of the ribbon around my hand again. 
And I slide it off my hand.

This will be the fluffy part of your bow!

I put the "to be fluffed" part of my bow on top of the knot I tied. Now I tie the first part over the "to be fluffed" part, and that way secure it into place. Then I tie it in a bow.

After you tied the bow over the "to be fluffed" part...... you fluff your bow! You seperate all the loops of the bow and a fluffy bow is born! Now this piece of card is ready to be mounted on the rest of the card :-)

And this is the finished card!

I hope this helps you create gorgeous and luscious fluffy bows on your cards or tags. For a tag you just thread the first part of the bow through the hole of the tag and follow the same steps from there.

Thank you for stepping by and I hope to see you again. 

Take care and keep your craft on!

Freddie
xxx


Thursday, May 18, 2017

"Painting" with embossing powders

The other day I shared a tag I made on facebook, and numerous people asked how I did it and wanted a tutorial. So I am going to show you how I did it.

This is the tag I first did with this technique. The swallow and flowers are different colours of embossing powder.


All you need is some card stock that is not too absorbant. You want your embossing ink to stay wet for as long as possible. I use a very smooth cars stock. And you need some colours of embossing powder and a craft stick or teeny tiny spoon. After the first try with my craft sticks, I looked online to see if I could find some laboratory scoops, so I can work even more precise. I am happy to say I found some on eBay and am waiting for those.

I selected a few of my glorious Emerald Creek embossing powders. They are so rich and some are so glittery. I used a stamp that would show off this technique well. 


Here you see the image stamped with embossing ink. I tried various types of paper to do this, a semi glossy or very smooth surface works best. 

With my craft srick I scooped up a small amount of embossing powder and sprinkled it over the areas that I want to be that colour. 

In this case I sprinkled Chinese red over the roses.

After I finished covering the red areas, I covered it with St. Paddy's green to colour the rest. In this case I only used two colours. On the finished tag you see that I did another image with more colours. You can sprinkle as many colours on an image as you like, just remember not to remove the excess powder before you are completely done. If you do the powder will stick to areas you don't want. So in the end, when you do tap off the excess embossing powder, you have a mix of various colours. I used some of it to heat emboss the sentiment. The rest I put in what I call the party jar. It is a jar with mixed embossingpowders. I use it sometimes for heat emboss embellishments or sentiments. It looks like miniature confetti.

Here I used Sweet Valentine and Sparkly Green powders also from Emerald Creek Craft Supplies.

On this stamped image I used the sparkly green, Easter Parade and Chinese red embossing powders. The more I played, the better I could control my powders. 
This was my favourite result yet....

I can't wait to get my mini scoops so I can play even more....

After staining a manila tag with tumbled glass distress stain, I stamped the sentiment with embossing ink and embossed it with the mixed powders leftover from my "painting". I die cut the florals and glued them on my tag. I stained a piece of crinkle ribbon with squeezed lemonade distress stain and made my fluffy bow. 

I will do another fluffy bow tutorial very soon. The other one I did was a long time ago, so a new one is required ;-) as people keep asking me how I make my bows.

I hope you enjoyed my experiment. I can't wait to see if more people are willing to try this.

Have a wonderful day, thank you for stepping by.

Take care and keep your craft on!
Freddie
xxx


Tuesday, May 2, 2017

Rosegarden lantern

It is no secret that I love the illuminary die from Tim Holtz, to create little lanterns. This time I made one decorated with red felt roses and aventurine and golden tigereye quarry stones from Emerald Creek Craft Supplies. As well as forrest foliage embossing powder, also from ECCS. I loooove their products!

I cut the illuminary from gold mirror card and very lightly sanded it with very coarse sand paper. I cut some vellum to size and as my husband was peeping into my room, to see what I was up to, said it would be cool to have a cracked window on one side, so I stamped a crack on one of the pieces of vellum. It was a cracker idea!!!


I cut some roses from red felt with the tattered pinecone die from Tim Holtz. It makes beautiful roses!! In the heart of the roses I glued some golden tigereye quarry stones to finish them off. I cut some leaves with a punch and heat embossed them with the vintage ivy embossing powder.

 Around the roses I glued some aventurine quarry stones to add some interest and texture. I think from all the quarry stones, the aventurine are my favourite.


And here the finished lantern :-)

Thank you so much for taking the time to have a look. I hope to see you here again.

Have a great day, take care and keep your craft on!

Freddie
xxx