Thursday, October 22, 2015

Alcohol ink background tutorial

I posted some tags today in various facebook groups and people kept asking me how I make the tartan/plaid backgrounds on some of them.

It is done with an ink blending tool and alcohol inks.

I cut some blank tags from specialty paper for alcohol inks. That could be glossy paper or just coated  paper. I have both but for this technique I prefer the coated paper that is also suited for copics or promarkers.
Most people that know me know I love working on tags. 

I squirted some alcohol
inks colours on my blending tool with felt. 

I drag the tool at an angle over the tag and create streaks of ink.

Once the whole tag is covered I reapply the colours on the blending tool and drag them over the tag in the other direction...
This creates the plaid effect....

This is a plain horizontal pattern. 

I like to do diagonal ones too, just to get some variety.

And this is how that looks like when finished. The possibilities are endless. It looks amazing in pastel colours aswel. 

It is so easy to do and quite addictive... :-)

For some detail you can draw some lines with a sharpie. Here I added a simple gold line.

Just give it a whirl, it is so fun and it gives you instant backgrounds. Just add embellishments or stamp over it.

Thank you for visiting. Take care and keep your craft on ;-)

Frederique
xxx


Friday, October 16, 2015

masking tutorial

I was blown away by the reactions about a tag I made using only stamps and masks. People kept asking how I do it. So to explain it step by step with the visual aid of pictures, I will try and tell you.


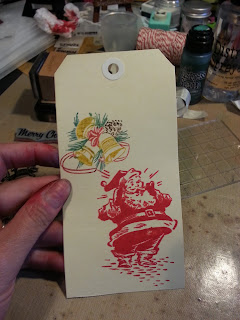
I start out with a blank card or tag. In this case I use a manila tag. I have two images I want to stamp and mask, and I have the background stamp. When masking you basically have to work backwards. The stamp you want in the foreground has to be stamped first.


I inked my image and stamp it on my tag.


And I stamp my second Image on my tag.

here you see both images that I want to keep on the front of the tag.

I have covered both images with the corresponding masks that I made when I got the stamps. I buy blank masking sheets, they are clear acetate sheets that are sticky on one side. I stamp on the non tacky side and then cut them out. This way you can use them over and over again.

I inked up my background stamp and stamp it over the masked off images.

Here you see that the mask gets inked and not the image underneath.

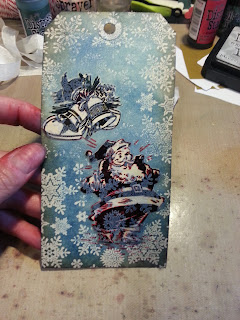
As I stamped with a pigment ink, my distress ink will be resisted. So I ink all over the tag to make the snowflake images pop. My two main images are still protected by the masks.


I have inked my whole tag and I love how the white Stazon ink resists the distress ink. Now it is time to reveal the result of the masking.....

Tadaaaaa.... the images are still clearly visible and on "top" of the background, eventhough they were stamped first. This is what I mean with working "backwards".

I stick my masks on the sheet that holds my cling mount stamps. The ones for wood mounted stamps I keep in a folder on an acetate sheet. That way they are all organised and ready to be used.

I inked the edges of the tag to give it some oompf and warmth and I coloured the boots and belt of Santa.And I gave his face a bit of colour.
I stamped the sentiment with embossing ink and heat embossed it in shiny black.
As the finishing touch I brushed some Wibk of Stella over the fur of the Santa Jacket and over the golden bells. I added a fluffy bow on top.
The tag is now done.

I hope this shows how I do my masking. If you have any questions, just ask. I am more than happy to explain. And if I don't know... I will find out ;-)

Have a great day and take care.
Keep your craft on.

Frederique
xxx